Navigation

Wednesday, 21 August 2013

Customising the Content Search Web Part - Part 2 - Custom Display Templates with JavaScript

This is the second post in a series I will be writing on the Content by Search Web Part (aka CSWP).
  1. What you get in the box
  2. Custom Display Templates with JavaScript (this post)
  3. Going Old Skool with XSLT
  4. Packaging & Deployment in Visual Studio
So if you've read Part 1 (what you get in the box) then you should have a pretty good idea of what the CSWP can do by now and what Display Templates and Property Mappings are (if you don't then go back and read Part 1 .. I won't be explaining them again).

So now we move onto the brave new world of building and defining your own custom Display Templates. The first thing you need to know is that Display Templates are stored in the Master Page Gallery (No, I don't know why) specifically in a sub-folder called "Display Templates".

Item Templates in the Master Page & Page Layouts Gallery
In here you will find two types of file:
  • HTML files - these are the actual Display Templates (and what you will copy/create when you create your own custom template)
  • JS files - These are the "compiled" JavaScript files which are automagically created by SharePoint when you add / modify one of the HTML templates

Display Template basics - Using JavaScript
The out of the box display template files actually include some pretty useful comments which tell you how this works, but basically you have two "tokens" that you need to use:

To Write JavaScript explicitly you need to use HTML comments with #_ and _# at each end. This tells SharePoint that it needs to take whatever is inside these tokens and "compile" it into JavaScript in the finished file. For example:

<!--#_ var myString = 'Hello World'; _#-->

This allows you to write pretty much any JavaScript that you like. You can use this JavaScript to retrieve values from your Property Mappings as follows:

<!--#_ var linkURL = $getItemValue(ctx, "Link URL"); _#-->

In the above example "Link URL" is the name of the Property Mapping. If you then want to use those variables in your HTML you simply wrap then in =#_ and _#= tokens. For example:

<a href="_#= linkURL =#_">
  <span> _#= myString =#_</span>
</a>

It really is that simple!

But before we look at actually creating a new Display Template, what we really need is a problem to solve (I find it helps to focus the mind) ..

A suitable problem - Pictures, Publishing Pages and Image Renditions, oh my!
One of the great new features in SharePoint 2013 is "Image Renditions" (explained in great detail by Waldek Mastykarz). The cool thing is that if you have registered an Image Rendition with a desired width / height then you can include those as URL attributes and SharePoint will resize the image server side! This is a fantastic feature, it (drastically) reduces image sizes and ensures that the output is consistently rendered.

The out of the box display templates will automatically use these Image Renditions (the "Large Picture" template for example will ask SharePoint for an image which is 468x220, which matches one of the out of the box image renditions).

However when you try to use Image Renditions with the CSWP then you get some pretty odd results. To demonstrate this I have uploaded 4 photos from one of my holidays a few years back. I then created a Publishing Page for each photo and selected different Image Renditions for each page.

I then displayed then using the CSWP using the "Large Picture" item template and here are the results:


CSWP displaying the actual photos in the Asset Library


CSWP displaying the Publishing Pages (and pulling the associated image)
 As you can see the second one looks a bit screwy as all of the images are different sizes. So what on earth is happening? Well, on checking the URL for one of the images which is being returned I can see that the image URL is correctly picking up the including the Rendition ID that I picked on my publishing page.

..photos/DSC_1002.JPG?RENDITIONID=1&width=468&height=220

This is bad, because when SharePoint renders an image it will first look for the RenditionID and if it finds one it will ignore the width and height attributes!

The solution - Custom Display Template
So in order to fix this we need to create ourselves a custom Display Template so we can strip out that RenditionID attribute using JavaScript so the images served by SharePoint come out in the correct size.

So first off, I went and downloaded a copy of the Item_LargePicture.html file (which I used as my starting point) and renamed it (to "Item_LargePictureFixed.html").

The next thing to do is to rename the <title> attribute in the file. This is what gets used in SharePoint to identify the template in the CSWP web part properties.

<title>Large Picture (FIXED)</title>

Now, I also wanted to add some more detail to my display template as just showing the title wasn't that great (bringing back the publishing date and author for the page would be cool) .. and it also allows me to demonstrate how the Property Mappings work.

So the next thing is to look for an XML element near the top of the file called mso:ManagedPropertyMapping. This contains all of the Property Mappings that the CSWP will pick up when your template is in use.

When you define Property Mappings you can also define the search properties it should look for and the format you need to use is:
<Mapping Name>:<Search Property1>;<SearchProperty2>
Each mapping is separated by a comma (,) so my custom mappings were
  • Image Title (mapped to "Title")
  • Image Date (mapped to "ImageDateCreated" and "LastModifiedTime")
  • File Author (mapped to "Author")

'Image Title':'Title','Image Date':'ImageDateCreated;LastModifiedTime','File Author':'Author'

Don't forget that our properties map to Search Properties .. so if the field isn't being indexed by Search then you won't be able to use it!

Once we had our mappings in place we can pull it all into variables using JavaScript. This includes a (slightly nasty) sub-string function to pull out any URL attributes for the Image URL

<!--#_

var pictureURL = $getItemValue(ctx, "Picture URL");

// get the picture URL as a string
var cleanPictureURL = pictureURL.toString();

// check if it contains any query string arguments
if(cleanPictureURL .indexOf("?") != -1)
{
  // if it does, then strip them out
  var renditionIndex = cleanPictureURL .indexOf("?");
  cleanPictureURL = cleanPictureURL .substring(0, renditionIndex);
}

// add the width/height attributes back in for the image renditions
cleanPictureURL = cleanPictureURL + "?width=468&height=220";

 
// get our three other property values
var imageTitle = $getItemValue(ctx, "Image Title");
var imageDate = $getItemValue(ctx, "Image Date");
var fileAuthor = $getItemValue(ctx, "File Author");

_#-->


Once that was done all we needed was to make sure our variables were used in the right parts of the HTML. I then uploaded the HTML file (which effectively installs the new Display Template) and wired it up in the Web Part.

New Display Template with new Property Mappings being displayed
 
New "fixed" Display Template with correct sized images, and new property mappings being displayed
If you want to take a closer look then you can download the example HTML file here:
http://sdrv.ms/172o9rM

So that is it for CSWP Display Templates .. in part three we will look at going old school with XSLT rendering.


Wednesday, 22 May 2013

Proud first time father :)

Sorry my activity has been a little slow, but I am extremely proud to announce the birth of my daughter (Amy) last week (mum and baby both doing great!).

Being a new dad is all very scary (and very, very tiring!) so please appreciate I might not be able to rattle out as much new content. Hopefully (when things settle down) I'll be back and writing up a bunch of cool stuff (so much to write about!)

Tuesday, 7 May 2013

DIWUG Magazine

The 10th Edition of the Dutch Information Worker Group (DIWUG) has been issued and I was honoured to be one of the guest authors.

For those who don't know the DIWUG magazines are released 2-3 times a year and contain a whole range of excellent content for IT Pros, Developers and End Users.

In this edition (April 2013) you can find me writing about Display Templates in the Content Search Web Part.

The full star-studded line up can be found below:

  • Custom Forms in SharePoint 2013 Workflows with Visual Studio 2012 - Andrew Connell
  • Pimp your SharePoint search results - Stefan Strube
  • SharePoint, Yammer and the social landscape - Chris Johnson
  • Protecting SharePoint 2013 with DPM 2012 - Sam Hassani
  • Strategic Thinking and SharePoint - Jaap Zwart
  • Custom Display Templates for the Content Search Web Part - Martin Hatch
  • Optimizing SQL Server 2012 for SharePoint 2013 - Brian Alderman
  • Enterprise Social Case Management, where Workflow and User Engagement meet - Marc Vanderheyden

  • You can grab a PDF of the magazine or an e-Reader edition from their website:
    http://www.diwug.nl/e-magazines/

    Friday, 12 April 2013

    Automatically extracting GPS data from photos and populating Geolocation fields in SharePoint 2013

    This has been a bit of a pet project of mine, ever since my wife spent 6 months working in the highlands of Scotland. She was taking a lot of photos and wanted to track the location easily (for a project). Now most modern mobile phones (and most high end DSLR cameras) can do this quite easily, but the problem has always been getting that location information out again .. so I thought:
    "Hey, now SharePoint has built-in Geo-Location support with mapping! Wouldn't it be great if we could extract the GPS data from photos automatically and map it from an asset library?"And this is how I did it ..
    SharePoint Geolocation and Bing Maps
    Well .. first off I wonder how many of you out there knew that SharePoint could do this out of the box:
    Pop-Up maps when you click on a Geolocation field in a SharePoint List View
    Adding a Geolocation field enables a new "Map View" which shows you all the "pins" and associated information
    That is completely "out of the box" mapping capabilities (not a single line of code). All you need to do is:
    • Create a Geolocation field (you won't be able to do this through the UI. You will need to create a field of type "Geolocation" either programmatically or through PowerShell)
    • Specify a Bing Maps API Key for your farm or site through PowerShell
    • Install the SQL CLR Types package on your Web Front End servers (as this is needed to use the new SQL Server "geo-spacial" data types)
    I'm not going to repeat all of the information in this blog post as this is already fairly well documented. You can find full instructions on how to configure this on TechNet here:
    http://msdn.microsoft.com/en-us/library/jj163135.aspx 
    There is also some pretty good blog content by Rich Ross (@rich_ross) and Tobias Zimmergren (@zimmergren):
    http://richross.me/2012/12/22/sharepoint-2013-geolocation/
    http://zimmergren.net/technical/sp-2013-getting-started-with-the-new-geolocation-field-in-sharepoint-2013 

    Photos, GPS and EXIF Information
    Now, if you want to start playing about with GPS and Photos then you need to at least know about EXIF. This is basically the widely adopted standard for storing additional information in photos (such as the date and location it was taken, as well as more photography specific info like the lense aperture, shutter speed and camera make / model which was used). All of this can be found in quite a lot of detail in the EXIF specification (if you are having trouble sleeping).
    You can actually see this in action if you look at the properties of an image file which you know has GPS information in it (say, one from your mobile phone).
    EXIF and Lat / Long information as seen from a file properties dialog
    Now two things should jump out at your here (especially as I've put a big red box around them both!). First is the EXIF version which as used (which shouldn't be of a massive interest to anyone, but at least shows you it has EXIF information).

    Secondly is the latitute and longitude values which we need for our GPS coordinates. What might strike you as slightly odd is the format, as they are actually made up of three numbers in the format:
    Degrees; Minutes; Seconds
    GPS coordinates used by Bing / Google maps (and also in SharePoint Geolocation fields) need to use "decimal-degrees" which you can get quite easily from the formula:
    Degrees + (Minutes / 60) + (Seconds / 3600)
    In order to actually get these values out and leverage this in code then you will need a library which can extract and parse this information. Serious credit needs to go to the codeplex project: ExifLib library by Scott McKenzie. I used this extensively in my code and it worked a charm!

    The usage of this library is pretty straightforward. First you load the image file as a .NET Stream object into the constructor.

    ExifLib.ExifReader reader = new ExifLib.ExifReader(stream);

    Once you've done that you use a generic method to spit out the EXIF tags using an enum and an out variable:

    double[] latitude = new double[3];
    double[] longitude = new double[3];
    reader.GetTagValue<double[]>(ExifLib.ExifTags.GPSLatitude, out latitude);
    reader.GetTagValue<double[]>(ExifLib.ExifTags.GPSLongitude, out longitude);

    Once Now the sharp among you may have already spotted that the format is a little odd, that we are pulling out a 3-element array of double values.

    This is because the EXIF information stores it in this format (the Degrees, Minutes, Seconds values) so we then need a simple method to convert them to "Decimal Degrees".

    static Double ConvertDegreesToDecimalDegrees(Double[] degrees)
    {
       if (degrees.Length == 3)  
       {                  
          Double returnValue = degrees[0] + 
             (degrees[1] / 60) + 
             (degrees[2] / 3600);    
          return returnValue;   
       }              
       else  
       {
          throw new ArgumentException("The degrees array must contain 3 different values for Degrees, Minutes and Seconds"); 
       }
    } 
    Once we have this method, it is pretty easy to convert the values over to a single double.
     
    double decimalLatitude = ConvertDegreesToDecimalDegrees(latitude);
    double decimalLongitude = ConvertDegreesToDecimalDegrees(longitude);

    However, this is not all, because imperial (degrees, minutes, seconds) values also include another nuance:
    • Longitude measures the distance from the GMT vertical line
    • Latitude measures the distance from the Equator
    For "normal" metric GPS coordinates to work we need to do the following:
    • Any longitude value which is WEST of the GMT line should be negative
    • Any latitude value which is SOUTH of the equator should be negative
    And we can work that out by using two other EXIF values known as "Longitude Ref" (which is either "W" or "E") and "Latitude Ref" (which is either "N" or "S"). This basically gives us our compass points. So we need a final check to make sure our values are correctly either positive or negative.

    string latitudeRef = String.Empty;
    string longitudeRef = String.Empty;
    
    reader.GetTagValue<string>(ExifLib.ExifTags.GPSLongitudeRef, out longitudeRef);
    reader.GetTagValue<string>(ExifLib.ExifTags.GPSLatitudeRef, out latitudeRef);
    
    if (latitudeRef == "S")
    {  
      // it is "south" therefore needs to be a negative number
      decimalLatitude = 0 - decimalLatitude;
    }
    
    if (longitudeRef == "W")
    {
      // it is "West" therefore needs to be a negative number
      decimalLongitude = 0 - decimalLongitude;
    } 

    Finally, once we have our values we can use the new SPFieldGeolocationValue class to assign it to a list item in SharePoint (in this case assigning it to a Geolocation field I created with an internal name of "Location")

    // update the location field
     properties.ListItem["Location"] = 
       new SPFieldGeolocationValue(decimalLatitude, decimalLongitude);
    
    // update the list item without affecting the modified date / editor
     properties.ListItem.SystemUpdate(false);

    Bringing this all together in SharePoint
    To be honest, for most SharePoint developers out there the rest should be pretty smooth sailing, but I'll show you the event receiver code below.

    public class ItemAddedReceiver : SPItemEventReceiver
        {
            public override void ItemUpdated(SPItemEventProperties properties)
            {
                if (properties.ListItem.File.Exists &&
                    properties.ListItem.Fields.ContainsField("Location"))
                {
                    byte[] fileBytes = properties.ListItem.File.OpenBinary();
    
                    MemoryStream stream = new MemoryStream(fileBytes);
    
                    try
                    {
                        ExifLib.ExifReader reader = new ExifLib.ExifReader(stream);
    
                        // we need 3-value double arrays
                        // the values are Degrees | Minutes | Seconds
                        double[] latitude = new double[3];
                        double[] longitude = new double[3];
    
                        // The Longitude and Latitude References tell us
                        // whether it is North or South of the Equator (Latitude) or
                        // whether it is West or East of Greenwich (Longitude)
                        // this will be a single character string representing
                        // the compass points ("N", "E", "S", "W")
                        string latitudeRef = String.Empty;
                        string longitudeRef = String.Empty;
                        
                        // try to retrieve values using the ExifLib library
                        // if the image doesn't find one of the values then this boolean 
                        // variable will be false
                        bool gotValue = reader.GetTagValue<double[]>(ExifLib.ExifTags.GPSLatitude, out latitude)
                            && reader.GetTagValue<double[]>(ExifLib.ExifTags.GPSLongitude, out longitude)
                            && reader.GetTagValue<string>(ExifLib.ExifTags.GPSLongitudeRef, out longitudeRef)
                            && reader.GetTagValue<string>(ExifLib.ExifTags.GPSLatitudeRef, out latitudeRef);
                                            
    
                        if (gotValue)
                        {
                            // convert degrees / minutes / seconds to decimal degrees
                            double decimalLatitude = ConvertDegreesToDecimalDegrees(latitude);
                            if (latitudeRef == "S")
                            {
                                // it is "south" therefore needs to be a negative number
                                decimalLatitude = 0 - decimalLatitude;
                            }
                            
                            double decimalLongitude = ConvertDegreesToDecimalDegrees(longitude);
                            if (longitudeRef == "W")
                            {
                                // it is "West" therefore needs to be a negative number
                                decimalLongitude = 0 - decimalLongitude;
                            }
    
                            // update the location field
                            properties.ListItem["Location"] = new SPFieldGeolocationValue(decimalLatitude, decimalLongitude);
                            properties.ListItem.SystemUpdate(false);
                        }
                    }
                    catch { }
                }
            }
    
            /// <summary>
            /// Converts degrees to a decimal-degree value
            /// Expects a Double array with 3 values (one for each of degrees / minutes / seconds)
            /// </summary>
            /// <param name="degrees">The Double[3] containing the original values</param>
            /// <returns>The new decimal degree value</returns>
            static Double ConvertDegreesToDecimalDegrees(Double[] degrees)
            {
                if (degrees.Length == 3)
                {
                    Double returnValue = degrees[0] + (degrees[1] / 60) + (degrees[2] / 3600);
                    return returnValue;
                }
                else
                {
                    throw new ArgumentException("The degrees array must contain 3 different values for Degrees, Minutes and Seconds");
                }
            }
        }

    I have also uploaded a full code sample (including a working version of the ExifLib.dll) which does the following:
    • Creates a Location site column and an Asset Library list instance
    • Event Receiver which fires on ItemAdded to extract the GPS EXIF info and place it into the Geolocation field.
    • Feature Receiver to add the Geolocation field and attach the event receiver to the asset library.


    You can download the package here: http://sdrv.ms/122g8Cs

    Hope you've enjoyed this post, and equally hope you can make use of the code samples! Enjoy.

    Wednesday, 20 February 2013

    Customising the Content Search Web Part - Part 1 - What you get in the box

    This is the first post in a series I will be writing on the Content by Search Web Part (aka CSWP).
    1. What you get in the box (this post)
    2. Custom Display Templates with JavaScript
    3. Going Old Skool with XSLT
    4. Packaging & Deployment in Visual Studio
    Search is quick, Search is vast, Search is better .. Well where do I start? SharePoint 2013 is all about Search. It has a completely rebuilt search engine which incorporates a lot of the awesome power that Microsoft gained from FAST over the years.

    I've seen, a lot of SharePoint projects over the years which have been based heavily around Search, typically using custom developed web parts based on the Search Core Results web part. Because the core search web parts used XSLT for their rendering we could totally customise the interface and output. They included an out of the box "paging" capability and through the query syntax you could build quite sophisticated queries.

    Search gives you the ability to pull immensely vast amounts of information from your sites (or other sites, public websites, file shares, even Exchange!) and return them in an extremely quick fashion. In terms of querying and returning information it is formidably fast the only real  downside being the time it takes for search to actually index your content (which even on a well optimised farm was only going to be around 15 minutes at best). SharePoint 2013 introduces Continuous Crawls which basically allows content to be indexed almost immediately (with typically around a 30 second delay).

    Even without those indexing issues though the main problem with these search based approaches is that they tended to have very unsophisticated editing capabilities for the people building the pages. You needed to have a damned good knowledge of the Search Keyword Query Syntax and this was just yet another hurdle for editors who are just trying to put pages together

    Enter the Content Search Web Part!
    The SharePoint 2013 solution to this is the Content by Search Web Part (CSWP) which is basically designed to be a replacement for the trusty Content by Query Web Part (CQWP) which we have been used to using in most of our projects in SharePoint 2007 and 2010.

    This includes a number of outstanding features:
    1. Very advanced "query editor" which use a separate pop-up dialog. This allows you to define very complex search queries to bring back almost any granularity of information
    2. Query shortcuts are also built into the query editor, so you can easily tell the web part to only return content from the current site, or site collection, or just return documents / pictures, or a whole range of other content.
    3. A range of different Display Templates are provided allowing you to switch between different "styles" (including paging!). These templates are fully extensible and adding your own custom templates will be covered in Part 2 of our series.
    4. The values being shown in the output can be controlled and modified using "Property Mappings" (which is covered later in this post).
    5. User Profile Tokens allow values in the current user's profile to be swapped out "on the fly". This is massive! This alone makes the CSWP worthwhile (e.g. pull back all news articles tagged with the user's department?)
    I could go on because this web part is immense and in every way an improvement. The performance is lightning quick and if you aren't using it then you really need to consider why not!

    The "Build Your Query" wizard
    The first thing we will look at is the query editor. This is a fantastic new wizard interface which you can access from the Web Part properties.
    
    Change Query pops up the Build Your Query pop-up
    This allows at first a basic mode which allows you to select from various prebuilt result sources. This in itself probably allows you to meet 90% of your search requirements.

    In Basic Mode, you can pick from result sources, restrict by site / URL and access basic selections
    The basic mode also allows access to an easy "Restrict by app" which effectively means "restrict by URL" but allows you to easily pick "Current Site" and "Current Site Collection".

    In Advanced mode you can construct pretty much any query you want using the SharePoint 2013 Keyword Query Language (KQL) Syntax.

    Advanced Mode allows extensive custom KQL queries, such as the above which returns people who have a profile picture and their "About Me" section contains the word "SharePoint"

    You can even refine this further using the "Refinement" panel which allows you to cherry pick different values in a very similar fashion to the refinement panels you will have seen in SharePoint search results pages.

    You can cherry pick refiners to trim down the results, much as you would if you were viewing a Search results page.
    You also have an ever-present "Test Results" panel on the right hand side which allows you to view what you might get in your results given the current settings...

    One other new addition is a new user token which allows you to include properties from the current user in your search queries dynamically (clearly great minds think alike... ).

    Adding the current user puts {User.Name} in the query
    Using the "Name of the user who runs the query" token places a construct of {User.Name} which will basically replace that with the name of the current user each time the page is accessed. I have found however that you can swap this out with other user profile properties as well (such as {User.Department} or {User.JobTitle} .. however not all of them seem to work, some experimentation is required!).

    This provides an amazing opportunity to create truly personalised feeds of information where the results are relevant to the current user, based on whatever they have selected in their profile.

    .. All in all, this is a fantastic improvement over any of the previous query editing interfaces in SharePoint, and allows you to configure in some cases extremely complex queries.

    Switching Display Templates and Configuring Property Mappings

    Note - in Part 2 of this series we will look at building our own custom Templates, but for now we will be looking at how we can customise the look using the out of the box templates.

    Now this should be familiar to anyone who is used to working with the Content by Query Web Part.

    First up lets talk about the display templates. A bunch of these come out of the box and basically control the look and feel of the contents of the web part. There are two types which you can select:
    • Control Templates - These determine the rendering container or wrapper of the contents
    • Item Templates - These determine the rendering of each item which is returned in the results

    Display Templates are picked from the Web Part Properties
    These are all JavaScript based, so you might see some delays before it renders, but they are in my experience both fast and adaptable.

    The specific templates you get are:

    Control Templates
    • List
    • List with Paging
    • Slideshow
    Item Templates
    • Diagnostic
    • Large Picture
    • Picture on Left, 3 Lines on right
    • Picture on Left, 3 Lines on bottom
    • Recommended Items: Picture on Left, 3 Lines on right
    • Two Lines
    • Video
    Most of these should be pretty self-explanatory but some of them deserve special mention.

    The List with paging control template adds next/previous paging controls (implemented using Async JavaScript) while the Slideshow control template provides a javascript based fade-in / fade-out animation.

    The Video item template actually adds an HTML5 video object but probably the most useful one is "Diagnostic". When picked this displays detailed information about your Property Mappings which is what allows you to really understand what information your Content by Search Web Part is displaying ..

    Property Mappings
    So .. what are these property mappings and what do they do?

    Well .. you remember some of the difficulty in trying to map fields to a Content by Query web part (and passing them back to the back-end XSLT)... well the Content by Search Web Part uses Property Mappings which map to Display Templates (which are JavaScript powered) .. and it works incredibly well!

    Basically the Item display template you pick will have a number of properties which need to be mapped, so in the example below I have picked the Item Template "Picture on Left, 3 Lines on right".

    As a result there are 5 properties which need mapping:
    • Picture URL (i.e. the image to be displayed)
    • Link URL (i.e. where you should go when you click on the item)
    • Line 1 - I have chosen Title
    • Line 2 - I have chosen Description
    • Line 3 - I have chosen LastModifiedTime

    Property Mappings allow you to control what appears in what parts of the chosen template
    The templates are generally intelligent enough to know if the property doesn't have any values, or if you haven't actually mapped it to anything.

    So this is yet another level of customisation you can apply, and the drop-down menu on each mapping allows you to cherry pick from the properties which have been indexed and mapped in the current search service.

    The really great thing here is that the mappings will change depending on the template (and when you get to building your own, you can specify your own mappings). This is where the Diagnostic item template really comes into its own, as it allows you to pull in 9 fields of your choice and it displays detailed information from the results, showing you what the value is and what the mapping is for each item.

    ...

    Well that is all for now so hope you realise like I do how powerful the Content by Search Web Part can truly be.

    Next in the Series : Custom Display Templates with JavaScript

    Monday, 18 February 2013

    Why I'm loving having my head in the Microsoft cloud

    Microsoft Disclaimer - Yes I am a Microsoft evangelist. I have been working with Microsoft tech for the entire of my working career. I know there are competing technologies out there, some of them perhaps more feature rich, or cheaper, or whatever .. but this is merely a conversational piece about my experience which I still believe is the ONLY supplier you can go to in order to get the complete service across all scenarios from the same supplier ... please don't troll, we don't feed them here!

    I have to admit up front .. I have never really been what you might call an "early adopter". I didn't get my first mobile phone until 2001.. Everyone I knew was using laptops for years while I got my first one for myself in 2010, and until recently all of my backups have been to portable disk drives sat in the drawer of my office at home.

    Things have changed though .. life is different and a whole lot easier .. I'm moved all of my stuff to "the cloud" just over a year back, and my cloud has a Microsoft logo!
    Terminology Disclaimer - Yes, I know .. "The Cloud" .. we used to just call these things Data Centres or 3rd Party Hosting. But you gotta keep with the times eh!
    Cloud Services
    So .. when I'm talking about "moving to the cloud" what exactly am I referring to? Well .. I've split this into two sections; Personal Use and Business Use.

    • Personal Use
      • Email (Hotmail)
      • Personal file storage (SkyDrive)
      • Sync between phone and desktop (Windows Phone)

    • Business Use
      • Email (Office 365 - Exchange Online)
      • Document Storage (Office 365 - SharePoint Online)
      • Collaborative workspaces (can't believe I'm actually using this phrase.. sorry!) (Office 365 - SharePoint Online)
      • Instant Messaging / Video Conferencing / Desktop Sharing (Office 365 - Lync Online)
      • Development Source Control (Team Foundation Service)
    ... and I could get all of this for £107 per year ...


    Personal Use - Email (free)
    I guess with this I've been a "cloud" user for quite some time. I've actually had my Hotmail account for over 16 years (1997 .. shortly after it was purchased by Microsoft). Ok .. so back in my youth I needed an email address and this was going through school as being the "cool new thing" so I signed up (didn't really use it much for the first couple of years though).

    That effectively took care of my personal email needs, and 16 years later I'm still using the same email address (and thanks to the pretty damned awesome junk mail filtering Microsoft have in place, I get very little spam at all, if any!).

    Personal Use - File Storage (£32 per year)
    So the next thing I was going to look for was personal file storage.. fast forward about a decade and my email account also led me to, of course, SkyDrive. Now this service has been around since 2007 and I got it "for free" because of my Hotmail account. Things really started to get interesting when LiveMesh was launched (the beta coming out in 2008) which allowed you to start syncing files on your workstation with your SkyDrive account.

    However .. LiveMesh was quite limited as it would only sync a maximum of 5GB of files to the cloud (regardless of how much free space you had .. I had 25GB of space in my SkyDrive account). I dabbled with this starting off by syncing My Documents and My Pictures using LiveMesh .. but the whole experience was a little bit clunky and to be honest .. with a 5GB maximum on there it was never going to be the most useful service to me. I still had tonnes of files sat on my workstation which I needed physical backups for and only having 1 computer I didn't really get any value out of a "access my files elsewhere" service either which is also what LiveMesh offered.

    Then came the game-changer! SkyDrive for Windows launched. This was huge (for me at least) as Microsoft had effectively opened up the floodgates. The new application  had very simple functionality which I tested for all of about 2 hours before removing LiveMesh as quickly as possible .. a worthy replacement had been found!

    The new capabilities of SkyDrive allowed me to sync ANYTHING I wanted with my SkyDrive account online, and I could sync up to my maximum file allowance (25GB .. but now options to increase this in increments up as high as 125GB if needed).

    I paid for the full 100GB extra storage (which cost me about £30 per year) and this basically takes care of all my backups. It runs seamlessly in the background, and it backs up all my documents, all my music, my pictures, videos and downloads..

    The best part is I can access them through the web, so I go to my parents and want to show them some photos or pull up something from one note I can hop on their machine and all my files are "just there" ..

    Personal Use - Phone to Desktop file sync (free?)
    The final piece to the jigsaw came together about 3 years ago when Windows Phone 7 was launched. I definitely jumped on this with both feet (my previous smartphones being a Nokia N95 and an HTC HD2). This also had SkyDrive integrated right from the get-go .. I could upload photos (automatically as I took them if needed) .. I could read my office files and documents from the built-in office hub straight off SkyDrive .. and it even used SkyDrive for the Twitter and Facebook storage for uploading images if I wanted to share them ..

    I've kind of marked this as "free" as I was going to buy a phone anyway. It didn't cost me any extra to get myself a Windows Phone 7 (in many cases cheaper than leading Android and Apple iOS devices) .. so yes, my phone contract cost me money .. but the cloud file sync bit was "free".

    Business Use - Office 365 (£75 per year)
    Well, this was mostly a recent requirement as I was formerly full-time worker and let my employer worry about things like hosting email and storing documents .. but in 2010 I joined the increasingly popular contractor route and set myself up with my own company ..

    Luckily Microsoft had also recently launched its own Office 365 services .. probably the best bang-for-your-buck online service you can get with fantastic quality, Enterprise level cover and small-business prices.

    For £6.25 per month (I went for the E1 plan) I could get:

    • Exchange Online - 25GB email mailbox with the latest Outlook web access
    • SharePoint Online - My own private SharePoint tenant, with all the standard bells and whistles to play with, and ability to invite external "Microsoft Account" users for free to join in!
    • Lync Online - federated with the MSN Messenger / Live Messenger network and all of the other federated Lync users (i.e. Microsoft / other Office 365 users / most Microsoft partner companies).
    This to be honest was a no brainer .. I am a SharePoint professional by trade, lets be honest, I was never going to choose anything else (not to mention for the price and featurset Office 365 is simply the best offering out there).

    The best bit is I could create "collaborative workspaces" (sorry again!) where I can spin up SharePoint sites (or site collections) to work on stuff with other people.

    The typical use case for me is sharing my finance files with my accountant .. and it felt a lot more professional when I can do this on my own branded site and (using my knowledge and experience of SharePoint) offer customised experience specifically for that need.

    Business Use - Team Foundation Service (free)
    The final piece to the puzzle was Source Control

    I do quite a lot of personal projects, typically working on code samples for when I'm speaking at community events (or writing up code for blog articles).

    I really struggled to work out how I could get easy backup for my source control... again this stemmed from my experience point .. I have spent almost my entire development career using Team Foundation Server (with a few painful years on Visual SourceSafe) .. the problem is that TFS hosting is typically damned expensive!

    Then the miracle came .. Microsoft was offering a preview service called "Team Foundation Service" (http://tfs.visualstudio.com/).

    This allowed me to create my own TFS projects and use full source control and even access to build agents!! This eventually went live and Microsoft announced that for small usage (up to 5 TFS projects) it was completely free!

    ...

    Well .. I made the big leap a while ago, and I am absolutely loving it! I have had to re-install my laptop twice in the past 12 months and I have never had a less painful experience!

    The process for getting all of my local files back ended up being:
    • Install Windows
    • Install SkyDrive for Windows
      • Start folder sync
    • Install Office 2013
      • Configure Outlook, start mailbox sync
      • Start SkyDrive Pro sync
    • Leave running overnight
    That was it .. next morning all of my files were back. I have never had to run a "backup schedule" or worry about losing my files ... stress free and painless computing. It has been so successful, I've even gotten my parents running on SkyDrive!


    SkyDrive and SkyDrive Pro Explained (Office 2013 and SharePoint 2013)


    Ok lets get something straight right off the bat ...
     

    SkyDrive Pro is not limited to Office 365. I've heard this stated now several times (from both laypersons and SharePoint professionals both) and it is simply not true. If you have a User Profile Service in SharePoint 2013 with My Sites enabled then you get the same SkyDrive Pro features to someone running Office 365 tenants!


    SkyDrive
    Ok, so first off this (https://skydrive.live.com) has absolutely NOTHING to do with "SkyDrive Pro" or SharePoint ...

    SkyDrive is a free cloud-based storage service that Microsoft have been offering for many many years now. It is part of the Outlook.com family (aka “Hotmail” | “Windows Live" | "Microsoft Account") and is basically a competing service for the likes of DropBox / iCloud / Google Drive.  By default you get a shared folder allowing you to share files with “the public” but you can also modify the permissions of any folder to either make it available for specific people or for “everyone” if you choose.

    It offers a web based interface (as well as apps for Windows 8, Windows Phone, iOS and Android) which allows you to store your documents and files, as well as free lightweight browser versions of Word / Excel / PowerPoint / OneNote.
     
    There is also a desktop application (SkyDrive for Windows, which is the successor to the popular "Live Mesh") which allows you to synchronise chosen SkyDrive folders to any folder on your computer (Drop-Box style) and this allows two-way synchronisation with that folder to “the cloud” where you files will be backed up and securely stored. The default location for this folder is in your main profile folder (e.g. "C:\Users\martin.hatch\SkyDrive") but you can select any folder location when the application first runs.
     
    The SkyDrive folder when you have SkyDrive for Windows installed
     
    SkyDrive is also one of the default save locations for Microsoft Office 2013 and also has close integration points with Windows 8 (with baked-in SkyDrive apps) and Windows Phone (auto-upload photos to SkyDrive, and it creates a SkyDrive folder to store twitter / facebook photos when you "share" them).

    The default flavour gives you 7GB of storage (the largest amount for any of the leading “free” packages) and allows you to expand this through paid-for storage adding up to 100GB extra content (for a total of 107 GB).
     
    Early adopters of SkyDrive were also rewarded with a “free” storage allowance of 25GB instead of 7GB.
     

    SkyDrive and SkyDrive Pro in SharePoint 2013 (aka “My Site Documents”)
    In the eternal fail which is Microsoft marketing naming conventions, there is also a “SkyDrive” link in the “suite links” bar at the top of each page in SharePoint 2013 (this is identical for both Office 365 and On Premise).

    SkyDrive appears as a link in the "Suite Bar Links" in SharePoint 2013
    This is actually just a link to the “Documents" library in what we used to call your “My Site”. By default this is an empty document library with a folder called “Shared with Everyone”.

    To add confusion to this, the top level title and descriptive text when you navigate to this library clearly calls it "Sky Drive Pro" ..

    The "SkyDrive Pro" library.. which you get to by clicking the "SkyDrive" link

    Why they called the link “SkyDrive” I don’t really know … perhaps “SkyDrive Pro” would have been a better name (keep reading to find out why !)
     
    SkyDrive Pro 2013 - the Windows Application
    Now this is where things get really confusing .. if you install Office 2013 Professional Plus then you also get a new application on your computer called “SkyDrive Pro 2013”

    The SkyDrive Pro 2013 tile on my Windows 8 Start Screen
    This is an application that runs in the desktop system tray and allows you basic access to “sync a library” with your computer. This can be ANY SharePoint 2013 document library (and I have also used it quite successfully with a number of SharePoint 2010 document libraries as well).
    SkyDrive Pro is an application that runs in the System Tray


    You can do this in one of two ways:

    • Run the “Sync a new Library” from the system tray, and type in the URL of the document library (you can also type in the URL of a site, and it will list the document libraries for you to select)
    • From the SharePoint 2013 interface click the “Sync” button when viewing a library
    The "SYNC" link in SharePoint 2013 will launch the SkyDrive Pro 2013 application
    Once you sync a library you get a new "SharePoint" folder which appears in your main profile folder alongside My Documents, My Pictures, etc .. (e.g. "C:\Users\martin.hatch\SharePoint").

    If you have synced some libraries using SkyDrive Pro 2013, you get this folder on your PC

    For each library that you sync it will create a new subfolder and will basically keep a two-way sync between the two of them (you add, edit or delete a file here and it gets replicated in SharePoint, and vice versa).

    Each new folder will get the name "<Site Title> - <Library Title>" although it seems to trim the library title if it is too long.

    The contents of my "SharePoint" folder .. having synced a bunch of libraries from SharePoint


    The SkyDrive Pro Folder – (also using the Office 2013 Desktop Application)
    Just to confuse things even further, there is also another “special” extra that they threw into the mix.

    If you sync the "SkyDrive Pro" library in your My Site (i.e. the one you get to if you click the “SkyDrive" link in the page header) then it doesn’t sync to the SharePoint Folder!

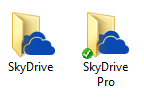
    Instead it creates a special folder called “SkyDrive Pro” which has the same icon as the main “SkyDrive” icon (if you have SkyDrive for Windows installed as well!). This is also installed in your profile folder (e.g. "C:\Users\martin.hatch\SkyDrive Pro").
     
    You can of course run both SkyDrive and SkyDrive Pro side-by-side, which is what I have shown below.
     
    SkyDrive Pro folder uses the same icon as the SkyDrive folder ..
     
    This then contains the contents of that actually library, but other than that it works the same way as other synchronised folders.

    One thing to note is that if you sync multiple SkyDrive Pro libraryes (say from different My Sites or different Office 365 tenants) then it will create multiple SkyDrive Pro folders.

    Syncing more than one SkyDrive Pro folder creates awesome folder names ..
     
    I have read elsewhere that you can rename these folders but when I tried to do this I started getting sync errors!

    Trying to "Sync" a SharePoint 2013 folder without "SkyDrive Pro 2013" installed
    This is another one which I have heard said before which is that trying to "Sync" a SharePoint 2013 library when you don't have Office 2013 installed (more specifically the SkyDrive Pro 2013 bit) will automatically install it on the fly... ?? ... erm ... no it doesn't.

    I tried this on my development VM (which doesn't have office installed) and I got two weird prompts in a row ..

    First I got a weird IE10 "do you want to allow this website to open an app on your computer?" question .. which immediately got alarm bells ringing ..

    This could be installing an app on the fly .. couldn't it?
    But then you get a generic "No apps are installed to open this type of link (grvopen)" error .. So basically it was trying to open a file which I don't have apps supported for.

    So it would seem that, no, you can't sync libraries without SkyDrive Pro 2013 installed.

    Fail and Error .. although interesting "Groove" reference
    My final parting shot on this is the interesting app type (grvopen) which is clearly a reference to "Groove Open" .. for those who don't know way back the old SharePoint synchronisation tool was an application called "Groove". This eventually got replaced with "SharePoint Workspace" which has now been replaced in the latest build with "SkyDrive Pro 2013".

    I honestly don't know if you can "Sync" with SharePoint Workspace or not, would love to hear if you can!

     ....
     
    So, that outlines the rough difference between Sky Drive and SkyDrive Pro J
     
    Recap
     
    • SkyDrive is a free service from Microsoft, and has nothing to do with Office or SharePoint
    • SkyDrive for Windows is a free desktop application which you can use to sync your SkyDrive folders with your computer
     
    • SkyDrive Pro is the personal library in your My Site, and you get to it from a "SkyDrive" link in the SharePoint 2013 header
    • SkyDrive Pro 2013 is an Office 2013 desktop application which you can use to sync SharePoint libraries to your computer (including your personal "SkyDrive Pro" library)


    Friday, 8 February 2013

    Conditional Query String Panel - CSS which is only used in a dialog

    This is something I initially knocked up so that I could add CSS to a page conditional on the query string present. I basically wanted to change the CSS if the page was showing a dialog.

    It is a very simple control which extends the ASP.Net "Panel" class (which basically outputs a DIV). I added some Pre-Render logic to check for a query string value and only show the contents if that Query String is present.

    Code
    public class ConditionalQueryStringPanel : Panel
    {     public String QueryString
       { get; set; }

       protected override void OnPreRender(EventArgs e)
       {       base.OnPreRender(e);
           this.Visible = Page.ClientQueryString.Contains(QueryString);
       }

    }


    In the example usage below I am using this panel to conditionally change the margin of one of my containers when the page is showing in a pop-up dialog

    Usage
    <MJH:ConditionalQueryStringPanel runat="server" QueryString="IsDlg=1">
        <style type="text/css">
          #contentBox
             margin-left: 0px;
          }    </style>
    </MJH:ConditionalQueryStringPanel>

    Something quite simple but hopefully you should be able to make use of it.